First Desktop of Summoner 7
This is exciting to create this poster with 14 characters in the demo
The Demo Screenshot of Summoner 7
Finally, all characters are in the demo!
First Elf in Summoner 7
Chuck Lin designed this character.
World map is done!
There are six big stages and 5 small stages in each of them.
Human Archer
My favorite character in Summoner 7.
May 31, 2013
May 07, 2013
April 22, 2013
First Scene in Summoner : Cave Altar
Monday, April 22, 2013
No comments
New tech to blend territories of two sides. And new UI, AI system, also new gameplay.
And first scene design:
February 14, 2013
January 25, 2013
January 11, 2013
Start to build characters......
Friday, January 11, 2013
No comments
The fist test characters is "Murloc Tank"
The concept is designed by Chuck Lin (my junior high classmate)
Mine part is to bring it into 3D
Quick Sculpt in ZB
Then, mesh it out
The concept is designed by Chuck Lin (my junior high classmate)
Mine part is to bring it into 3D
Quick Sculpt in ZB
Then, mesh it out
January 08, 2013
December 05, 2012
On the way to become an indie maker.....
Wednesday, December 05, 2012
No comments
prototyping my second indie game: Summoner 7
(all characters are pre-holders and not from my design)
new progress: I got VFX work! I summon the to fight!
(all characters are pre-holders and not from my design)
new progress: I got VFX work! I summon the to fight!
May 08, 2012
Transferring animation tool for Theblu makers
Tuesday, May 08, 2012
3 comments
In Theblu, makers are allowed to submit same kind of species. However, since the model won't be the same from different makers, the rig and the animation would be different. However they could be similar. So we need such a tool to help us to create easy animation from old animation resources.
The tool allows user to export animation data as text file and apply on to other similar skinned model.
For example, we are going to transfer the swim animation from queen angelfish to Garibaldi fish. (because they are similar)
So first, we export the swim animation from queen angelfish by just opening the tool and hitting export with rotation value.
Then export the rig form Queen Angelfish. And skin it on to the Garibaldi. Of course you can move the pivot of joints, and scale the root. Even you can change the structure of the rig and delete some end joints. Just don't change the orient of any joints.
Next, open the tool and import the text file that we just export from Queen Angelfish. The tool will show all of your rig in the current scene and the imported file.
Next, you can just hit the auto mapping. The tool will match two joints with the same name. After hitting, it will show all joints which cannot be matched. In this case, those joints are not needed for Garibaldi.
The tool allows user to export animation data as text file and apply on to other similar skinned model.
For example, we are going to transfer the swim animation from queen angelfish to Garibaldi fish. (because they are similar)
So first, we export the swim animation from queen angelfish by just opening the tool and hitting export with rotation value.
Then export the rig form Queen Angelfish. And skin it on to the Garibaldi. Of course you can move the pivot of joints, and scale the root. Even you can change the structure of the rig and delete some end joints. Just don't change the orient of any joints.
Next, open the tool and import the text file that we just export from Queen Angelfish. The tool will show all of your rig in the current scene and the imported file.
Next, you can just hit the auto mapping. The tool will match two joints with the same name. After hitting, it will show all joints which cannot be matched. In this case, those joints are not needed for Garibaldi.
Now, go to apply tab and hit apply. Then we finished the animation transferring.
To finish this animation from model only took me less than 10 mins. Is that great?
Here's the process video. Please look it in HD mode.
March 21, 2012
Custom fire particle UV distortion shader in Unity
Wednesday, March 21, 2012
22 comments
It's a really common solution to simulate realistic fire in cheap way. (without frame animations)
But it's not built in Unity 3.5...... So, I tried to make my own.
The shader is composed by: additive + noise UV distiortion
Fire texture is from Unity package (no alpha value):
the noise texture is from Unity community:
The scene is used only for this demo and came from Unity community.
Let's see the result:
first: just the additive shader without UV distortion (but with noise)
second: additive + UV distortion
But it's not built in Unity 3.5...... So, I tried to make my own.
The shader is composed by: additive + noise UV distiortion
Fire texture is from Unity package (no alpha value):
the noise texture is from Unity community:
The scene is used only for this demo and came from Unity community.
Let's see the result:
first: just the additive shader without UV distortion (but with noise)
second: additive + UV distortion
If you need shader code, you can leave me a message.
March 20, 2012
March 13, 2012
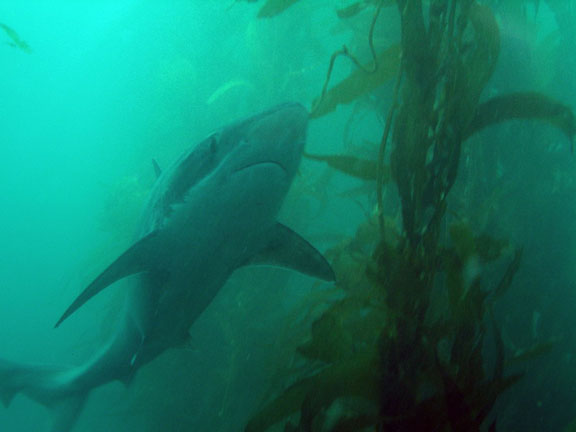
School Shark wip
Tuesday, March 13, 2012
No comments
School Shark has many names: Soupfin Shark, Tope Shark, Snapper Shark, Vitamin Shark....etc
It's a really beautiful creature, and it's going to be in theblu!!
Done! in three days.......
It's a really beautiful creature, and it's going to be in theblu!!
Done! in three days.......
February 07, 2012
Issue of Mirrored UVs and Normal Map when rendering in Unity
Tuesday, February 07, 2012
3 comments
Recently, I found my model has normal map seam when rendering in Unity with our custom shader.
And I try to use the Unity built-in shader to render it. The result shows that there's no seams. How strange? Soon I found that because of all UV of my models are symmetry. It means that half of my UV are flipped. Hence, the binormal of the half model has been reversed. (tangent basis is calculated by normal and UV, http://www.3dkingdoms.com/weekly/weekly.php?a=37). In Maya, I never notice that, because it auto-detects the UV winding direction. So, I just need to do the same thing in my shader.
So after researching, I got the method how to detect the UV winding. Here's the formula:
tangent[a].w = (Dot(Cross(n, t), tan2[a]) < 0.0F) ? -1.0F : 1.0F;
here tangent is stored by float4, the w stores the UV winding direction, 1, or -1.
And tan2 would be the binormal, n is the normal, and t is the actual orthogonalized tangent.
Although this equation answer my question, it didn't solve my problem. It's kind impossible to calculated the orthogonalized tangent in a shader. But it give me a hint. Would Unity has calculated the UV winding for us and stored it in tangent.w?
With an easy debug shader to show the tangent.w, I got my answer:
And I try to use the Unity built-in shader to render it. The result shows that there's no seams. How strange? Soon I found that because of all UV of my models are symmetry. It means that half of my UV are flipped. Hence, the binormal of the half model has been reversed. (tangent basis is calculated by normal and UV, http://www.3dkingdoms.com/weekly/weekly.php?a=37). In Maya, I never notice that, because it auto-detects the UV winding direction. So, I just need to do the same thing in my shader.
So after researching, I got the method how to detect the UV winding. Here's the formula:
tangent[a].w = (Dot(Cross(n, t), tan2[a]) < 0.0F) ? -1.0F : 1.0F;
here tangent is stored by float4, the w stores the UV winding direction, 1, or -1.
And tan2 would be the binormal, n is the normal, and t is the actual orthogonalized tangent.
Although this equation answer my question, it didn't solve my problem. It's kind impossible to calculated the orthogonalized tangent in a shader. But it give me a hint. Would Unity has calculated the UV winding for us and stored it in tangent.w?
With an easy debug shader to show the tangent.w, I got my answer:
So the actual key is:
I just need to write a branch to see if I need to flip the binormal when calculating the tangent space.
float3x3 rotation = float3x3(v.tangent.xyz, binormal.xyz, v.normal.xyz);
if(v.tangent.w > 0)
rotation = float3x3(v.tangent.xyz, -binormal.xyz, v.normal.xyz);
So, here is the result without the UV winding detection:
And this is the correct rendering with UV winding detection
Note: Why we don't want to use the built-int shader in Unity? Just because even the shader is simple as bump spec one which really has a lot of junk inside. And the most important: they hide those expensive calculations in compiled functions.
Subscribe to:
Posts (Atom)